Can I SSH Into A Pi On A Different Network? A Comprehensive Guide
Have you ever wondered if it's possible to SSH into your Raspberry Pi from a different network? The answer is yes, and this guide will walk you through the entire process. Whether you're managing remote projects, troubleshooting devices, or simply exploring the capabilities of your Pi, understanding how to securely connect to it over the internet is essential. This article will provide detailed steps, expert tips, and trusted methods to ensure you can access your Raspberry Pi from anywhere in the world.
SSH (Secure Shell) is a powerful protocol that allows you to remotely control your Raspberry Pi. While connecting to your Pi on the same local network is straightforward, accessing it from a different network introduces additional considerations. Security, network configurations, and proper setup play a critical role in ensuring a seamless and safe connection. In this guide, we'll cover everything you need to know, including prerequisites, step-by-step instructions, and best practices.
By the end of this article, you'll have the knowledge to confidently SSH into your Raspberry Pi from any network. We'll also address potential challenges and provide solutions to help you troubleshoot common issues. Whether you're a beginner or an experienced user, this guide is designed to be accessible, informative, and actionable.
Read also:Knicks Future Draft Picks A Comprehensive Guide To Building A Championship Team
Table of Contents
Introduction to SSH
SSH, or Secure Shell, is a cryptographic network protocol used to securely access and manage devices remotely. It encrypts all data transmitted between the client and server, ensuring confidentiality and integrity. SSH is widely used in various applications, from managing servers to controlling IoT devices like the Raspberry Pi.
The primary advantage of SSH is its security. Unlike older protocols such as Telnet, SSH encrypts all communication, protecting sensitive data from interception. This makes it an ideal choice for remote access, especially when connecting over public or untrusted networks.
Why Use SSH with Raspberry Pi?
Raspberry Pi is a versatile single-board computer that can be used for a wide range of projects, from home automation to web servers. SSH allows you to control your Pi remotely, making it easier to manage without needing physical access. Whether you're updating software, monitoring performance, or troubleshooting issues, SSH provides a convenient and secure solution.
Prerequisites for SSH Access
Before you can SSH into your Raspberry Pi from a different network, there are a few prerequisites you need to address. These include enabling SSH on your Pi, ensuring it has a stable internet connection, and configuring your router for remote access.
1. Enable SSH on Your Raspberry Pi
To enable SSH on your Raspberry Pi, follow these steps:
- Open the terminal on your Pi or connect it to a monitor and keyboard.
- Run the command
sudo raspi-config. - Navigate to "Interfacing Options" and select "SSH."
- Choose "Yes" to enable SSH and exit the configuration tool.
Alternatively, you can create an empty file named ssh in the boot partition of your Pi's SD card. This will automatically enable SSH on the next boot.
Read also:Underwater Welder Salary In Canada Comprehensive Guide To Earnings And Opportunities
2. Ensure a Stable Internet Connection
Your Raspberry Pi must be connected to the internet via Wi-Fi or Ethernet. A stable connection is crucial for maintaining a reliable SSH session. If you're using Wi-Fi, ensure the signal strength is adequate and the network is secure.
3. Gather Network Information
Before proceeding, you'll need the following information:
- Your Pi's local IP address (use
hostname -Iin the terminal). - Your router's public IP address (check your router's admin panel or visit whatismyip.com).
- Your router's login credentials for configuring port forwarding.
Configuring Your Raspberry Pi for SSH
Once SSH is enabled, you need to configure your Pi to allow remote access. This involves setting up authentication methods and ensuring the SSH service is running correctly.
1. Set Up SSH Keys for Authentication
Using SSH keys instead of passwords provides an additional layer of security. Here's how to set them up:
- On your local machine, generate an SSH key pair using
ssh-keygen. - Copy the public key to your Pi using
ssh-copy-id pi@. - Disable password authentication by editing the SSH configuration file (
/etc/ssh/sshd_config) and settingPasswordAuthentication no.
2. Test the SSH Connection Locally
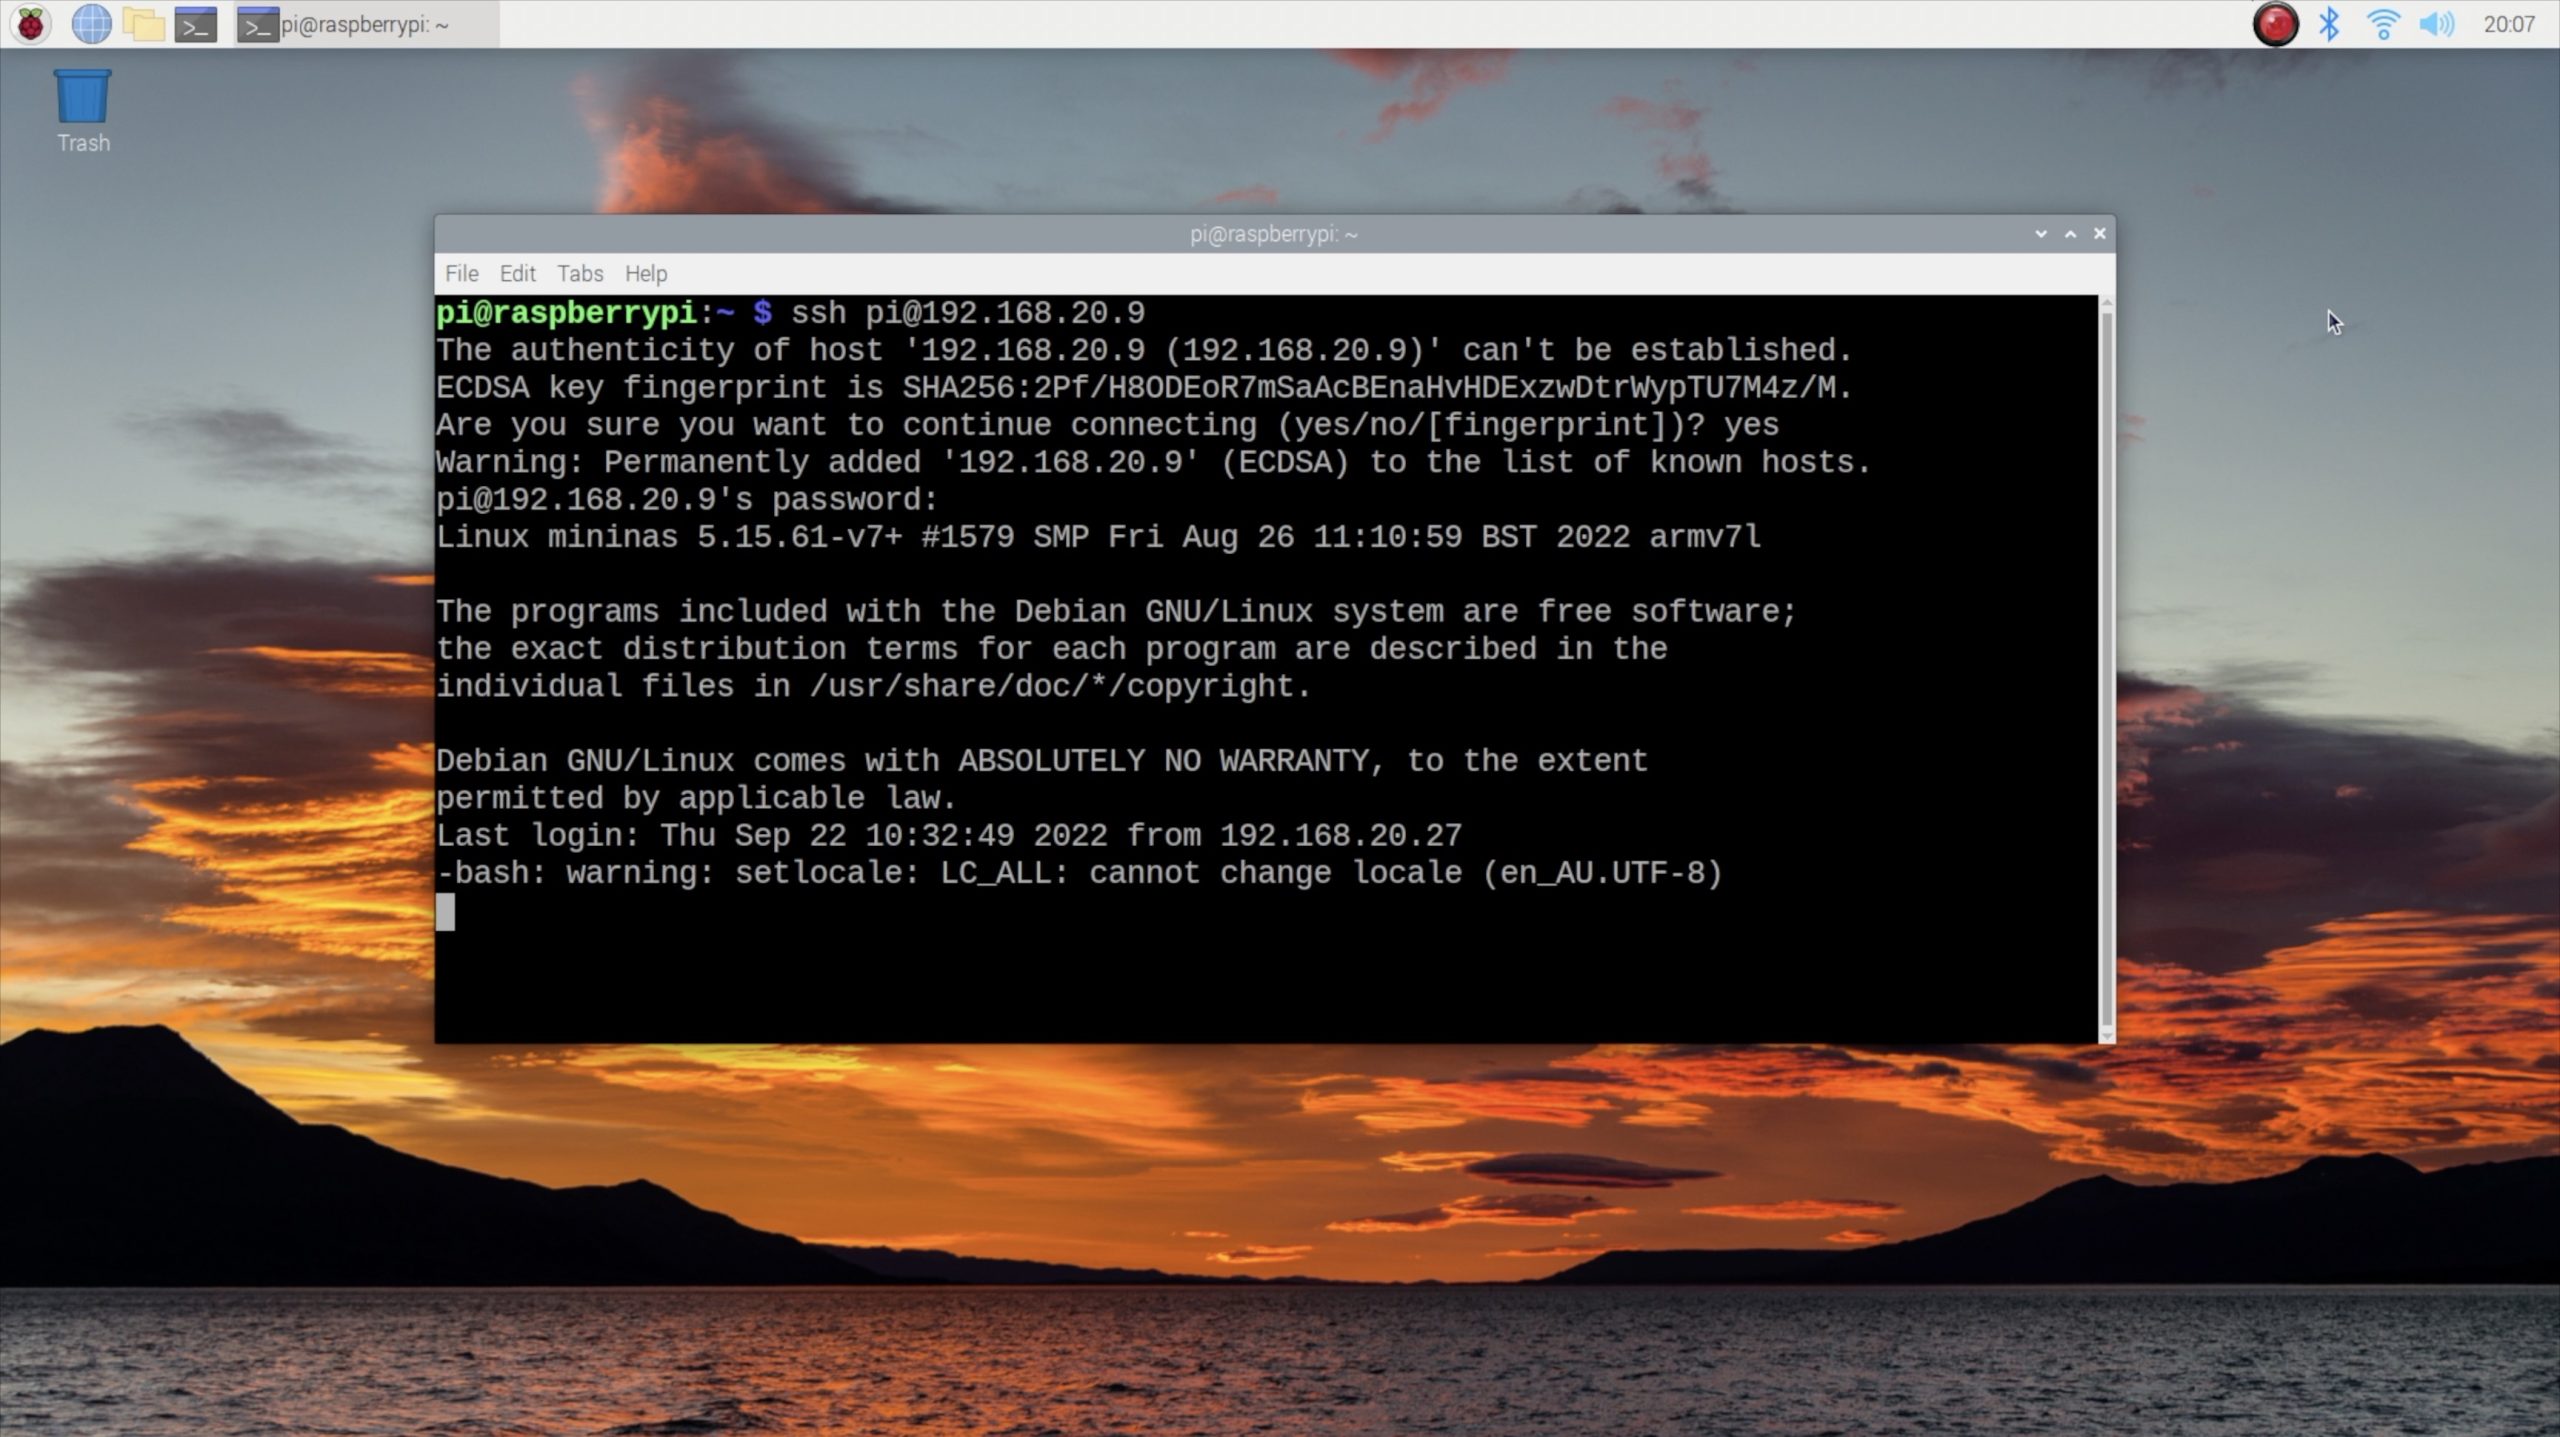
Before attempting to connect from a different network, test the SSH connection on your local network. Use the command ssh pi@ to ensure everything is working correctly.
Understanding Network Requirements
To SSH into your Raspberry Pi from a different network, you need to understand how networks and IP addresses work. This section explains key concepts like public IP addresses, NAT, and port forwarding.
1. Public vs. Private IP Addresses
Your Raspberry Pi has a private IP address assigned by your router, which is only accessible within your local network. To access it remotely, you need your router's public IP address, which is visible to the internet.
2. Network Address Translation (NAT)
NAT allows multiple devices on your local network to share a single public IP address. However, this also means that external devices cannot directly access your Pi without additional configuration.
Setting Up Port Forwarding
Port forwarding is essential for allowing external devices to connect to your Raspberry Pi. This section explains how to configure your router to forward SSH traffic to your Pi.
1. Access Your Router's Admin Panel
Log in to your router's admin panel using its IP address (commonly 192.168.1.1 or 192.168.0.1). Refer to your router's manual for specific instructions.
2. Configure Port Forwarding Rules
Create a new port forwarding rule with the following settings:
- External Port: 22 (default SSH port).
- Internal IP Address: Your Pi's local IP address.
- Internal Port: 22.
- Protocol: TCP.
Save the changes and restart your router if necessary.
Using a VPN for Secure Access
A Virtual Private Network (VPN) provides a secure way to access your Raspberry Pi without exposing it to the internet. This section explores the benefits and setup process of using a VPN.
1. Benefits of Using a VPN
Using a VPN eliminates the need for port forwarding and reduces the risk of unauthorized access. It creates a private network tunnel between your device and your Pi, ensuring all communication is encrypted.
2. Setting Up a VPN on Your Pi
Popular VPN solutions for Raspberry Pi include OpenVPN and WireGuard. Follow the official documentation for your chosen VPN software to set it up on your Pi.
Dynamic DNS Solutions
If your internet service provider assigns a dynamic public IP address, a Dynamic DNS (DDNS) service can help. DDNS maps a domain name to your changing IP address, making it easier to connect to your Pi.
1. Popular DDNS Providers
Some popular DDNS services include:
- No-IP
- DuckDNS
- FreeDNS
2. Configuring DDNS on Your Router
Many routers support DDNS integration. Log in to your router's admin panel, navigate to the DDNS settings, and enter your DDNS provider's credentials.
Troubleshooting Common Issues
Despite careful setup, you may encounter issues when trying to SSH into your Pi. This section addresses common problems and provides solutions.
1. Connection Refused
If you receive a "Connection Refused" error, ensure that:
- SSH is enabled on your Pi.
- Port forwarding is correctly configured.
- Your firewall is not blocking SSH traffic.
2. Timeout Errors
Timeout errors may occur due to:
- An incorrect public IP address.
- ISP restrictions on incoming connections.
- Network congestion or instability.
Best Practices for Remote Access
To ensure a secure and reliable connection, follow these best practices:
- Use strong passwords or SSH keys for authentication.
- Regularly update your Pi's software to patch vulnerabilities.
- Monitor your router's logs for suspicious activity.
- Disable unused services to reduce the attack surface.
Conclusion and Next Steps
SSH into your Raspberry Pi from a different network is entirely possible with the right setup. By enabling SSH, configuring port forwarding, and following security best practices, you can securely access your Pi from anywhere in the world. Whether you're using a VPN, DDNS, or direct port forwarding, this guide has provided the tools and knowledge you need to succeed.
If you found this article helpful, please share it with others who might benefit. Leave a comment below with your thoughts or questions, and explore our other articles for more tips and tutorials. Happy SSH-ing!
CrazyJamJam Nides: Exploring The World Of Creative Digital Art
Hanna Punzel: The Rising Star Of Modern Entertainment
Caitlin Clark News Europe: The Rising Star Making Waves Across The Continent
SSH Into Pi Zero The DIY Life
VirtualBox SSH Network Guide Raspberry Pi Desktop bluetin.io
